Get started
One Shelly, three parts, about 10 minutes. This guide takes you from zero to first savings — starting tomorrow.
Check these before you start
- Email access: you need it to register your Optimaatti account.
- Shelly device installed: device is in place and powered on. For models that require electrical wiring, always use a qualified electrician.
- Optimaatti app on your phone: newer Shellys are added directly with it over Bluetooth. You only need the Shelly app for the alternative Wi-Fi method (older devices).
- Your home Wi-Fi password: your phone is on the same network that Shelly will use.
Start with one device — a water heater or an electric heater works best. Savings begin fastest from these. Once the first one works, adding more is quick.
Electrical safety
If installing Shelly requires electrical wiring, always use a qualified electrician. Plug-in models you can install yourself.
Optimaatti account
Create an account and get your own connection details.
- 1
Register
OptimaattiCreate a free account to get your own connection details.
- Open `https://app.optimaatti.fi` on your phone or computer.
- Tap `Register` and enter your email and a password.
- Verify your email by clicking the link sent to you.
- Sign in.
Keep the browser open — you will continue from the same place in step 2.
- 2
Copy the connection details
OptimaattiFour values tell Shelly how to find Optimaatti.
- Open the `Connection details` page from the menu.
- You will see four fields: server address, port, username and password.
- Copy them or keep the page open in another tab.
- Use the values exactly as shown.

The Connection details page shows the server, port, username and password all in one view. Check these in the screenshot:
- 11. Open the `Connection details` page from the menu.
- 22. You will see four fields: server address, port, username and password.
- 33. Copy them or keep the page open in another tab.
The password is shown only on this page. Copy it now — you can always regenerate a new one later if it gets lost.
Advanced: what these values are
These are device connection details. MQTT is the technical connection behind the scenes, but in practice you copy only the server, port, username and password. Multiple Shellys can share the same details — a device-specific client id separates them automatically. Port 8883 uses TLS encryption (recommended), 1883 is an unencrypted connection.
Connect Shelly
Easiest over Bluetooth — or manually for older devices.
- 3
Add Shelly with your phone (Bluetooth)
OptimaattiThe easiest way for newer Shellys (Gen2, Gen3, Gen4). The Optimaatti app sets the Wi-Fi credentials and the Optimaatti connection in one go — you do not need a separate Shelly app and you do not switch your phone's Wi-Fi network. If you use this, skip step 4 and go to step 5.
- Open the Optimaatti app and start adding a new device.
- Choose "Add Shelly with your phone" (the Bluetooth method).
- Make sure the Shelly is powered and near your phone — the app finds it automatically.
- Pick the device from the list and enter your home Wi-Fi name and password.
- Press "Connect device". The Optimaatti connection is filled in automatically.
- The device reboots, joins Wi-Fi and appears in your Optimaatti device list in about 20 seconds.
The Bluetooth method needs a Shelly Gen2 or newer and Bluetooth turned on on your phone.
Older device (Gen1)? Connect it to Wi-Fi with the Shelly app first
Open the Shelly app, tap "Add Device" and follow the guided setup. Pick your home Wi-Fi and enter its password. Once the device shows up in the Shelly app device list, continue to step 4 and enter the Optimaatti connection details. - 4
Alternative: link to Optimaatti manually
Shelly appOnly for the manual Wi-Fi method (older devices). If you added the device with Bluetooth in step 3, it is already connected — skip this and go to step 5.
- In the Shelly app, open the device settings.
- Find the connection section (`MQTT`) and turn it on.
- Enter the values you copied in step 2: server, port, username and password.
- Check there are no extra spaces in any field.
- Save. Shelly will connect to Optimaatti within seconds.

Copy the connection details from Optimaatti to your Shelly settings. Use them exactly as shown. Check these in the screenshot:
- 11. In the Shelly app, open the device settings.
- 22. Find the connection section (`MQTT`) and turn it on.
- 33. Enter the values you copied in step 2: server, port, username and password.
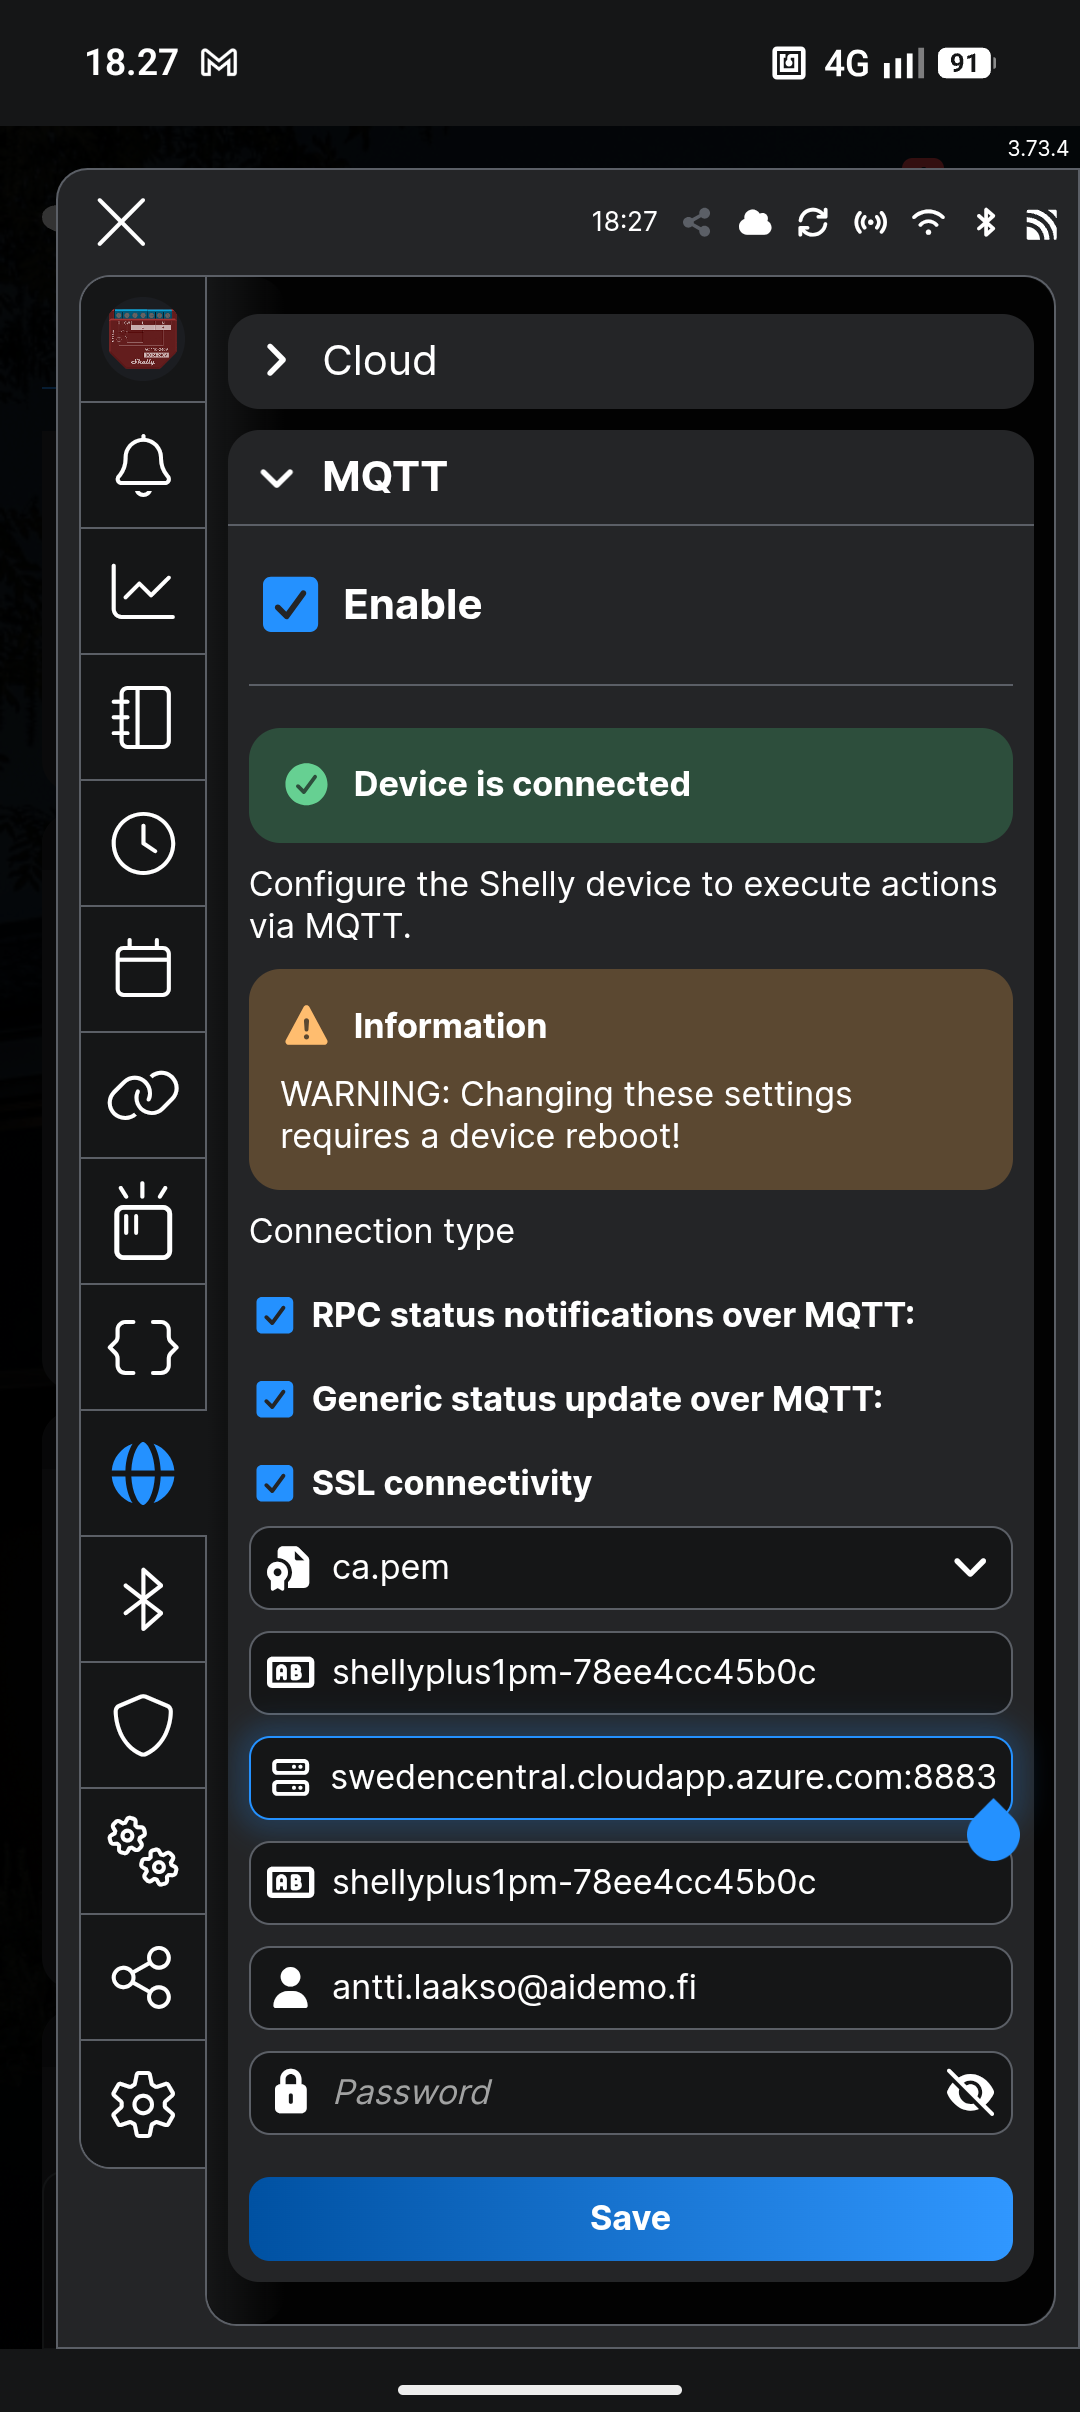
Shelly app connection view. Same four values. Check these in the screenshot:
- 11. In the Shelly app, open the device settings.
- 22. Find the connection section (`MQTT`) and turn it on.
- 33. Enter the values you copied in step 2: server, port, username and password.
Open the detailed visual guideIf saving fails or the connection drops immediately, check you did not paste a trailing space after the password — this is the most common cause.
Advanced: via the browser (alternative)
You can also open the Shelly web UI directly in a browser using the device IP address. Settings are under Settings → MQTT. This is only needed in special cases — the app is easier. - 5
Check the device shows up
OptimaattiWhen the connection works, the device appears in Optimaatti automatically.
- Go back to Optimaatti and open the `Devices` page.
- Wait 1–2 minutes. The device will appear in the list automatically.
- Give it a clear name: for example `Water heater` or `Sauna stove`.
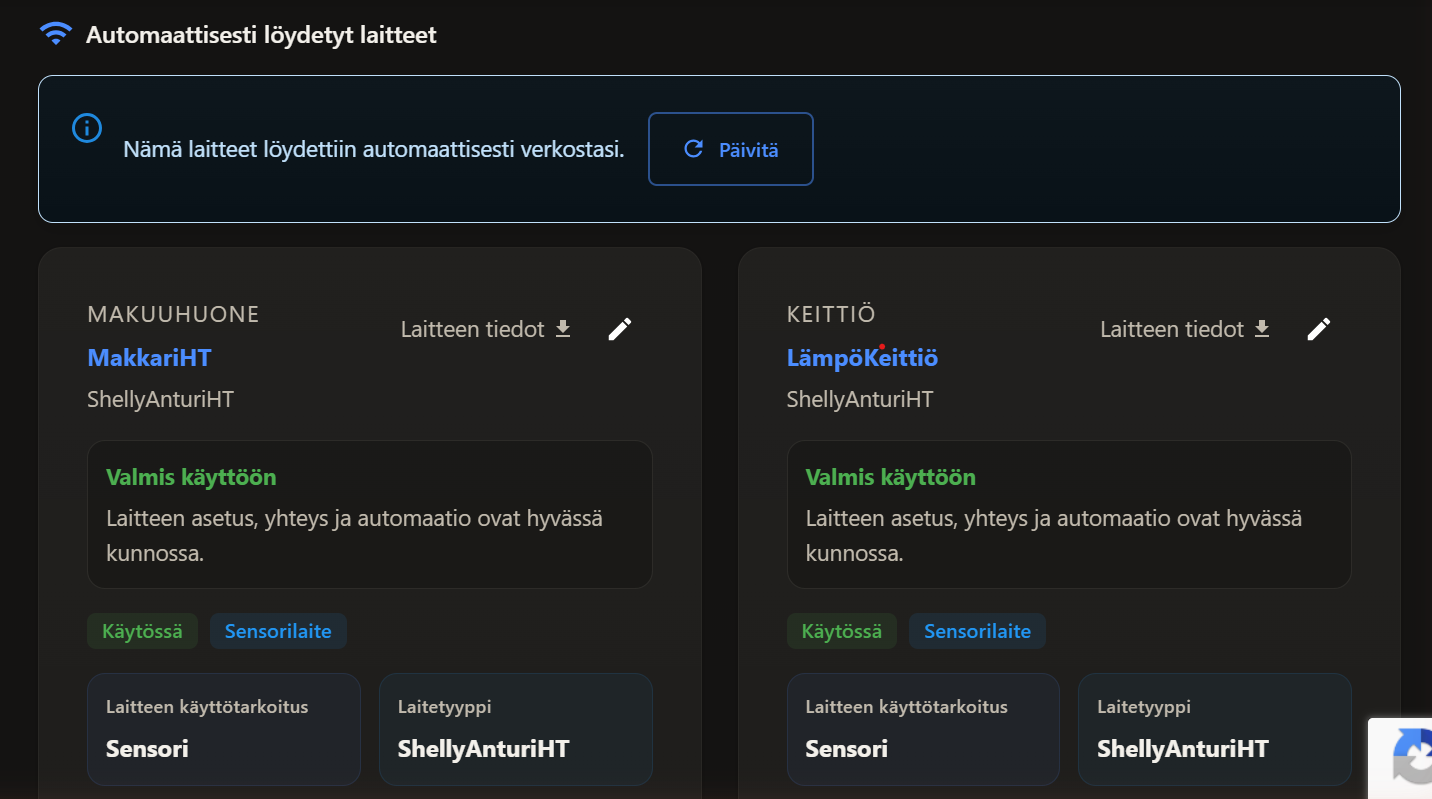
The Devices page shows each connected Shelly on its own card. Check these in the screenshot:
- 11. Go back to Optimaatti and open the `Devices` page.
- 22. Wait 1–2 minutes. The device will appear in the list automatically.
- 33. Give it a clear name: for example `Water heater` or `Sauna stove`.
If the device does not appear within 5 minutes, the most common cause is a typo in the password. Go back to step 4 and check each field.
First savings
Pick a device type and create a rule.
- 6
Tell the app what the device controls
OptimaattiPicking the device type helps Optimaatti suggest the right settings.
- Open the device details from the list and tap `Edit`.
- Choose the device type: water heater, heater, light control or other.
- If the device measures electricity use, enable metering — you will see consumption on the Costs page.
- Save.
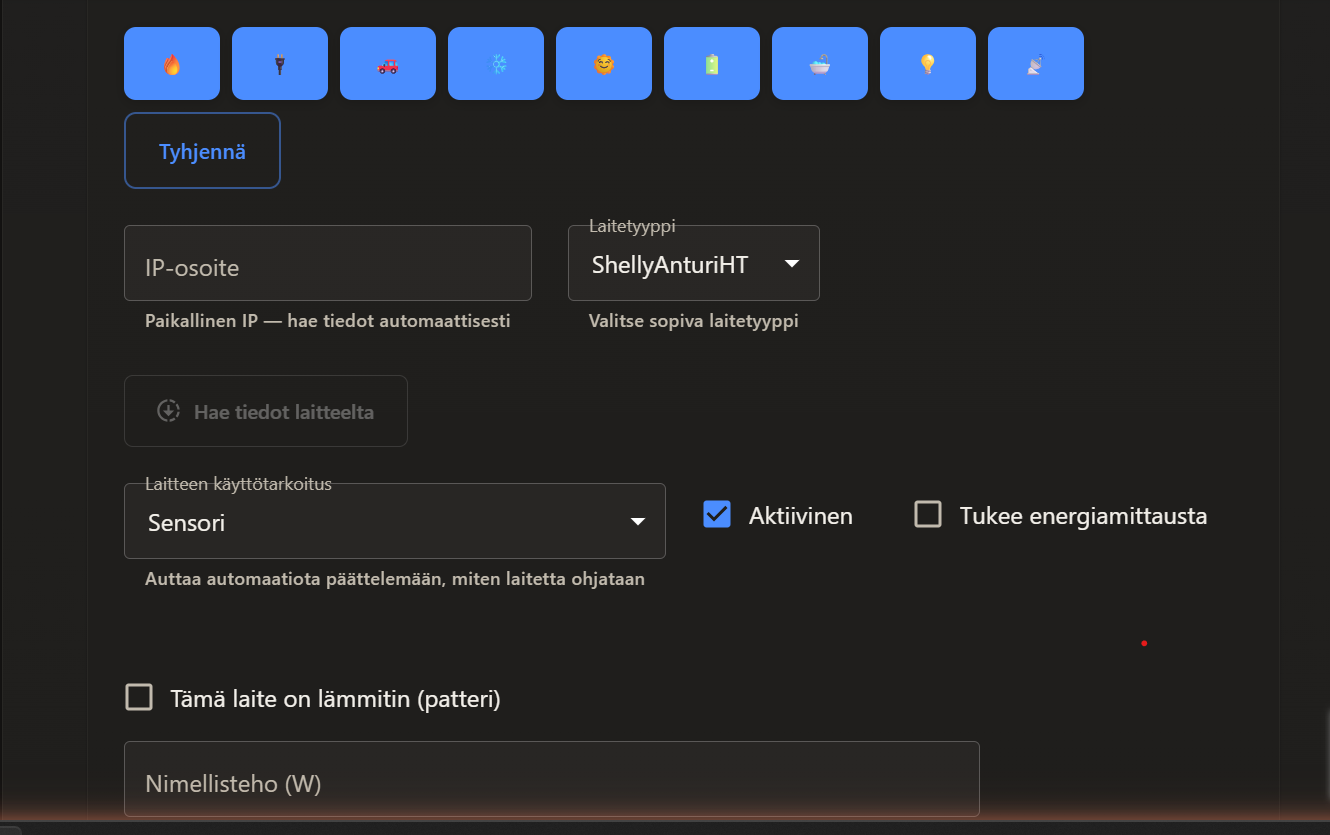
Device edit view: choose the device type and enable metering if needed. Check these in the screenshot:
- 11. Open the device details from the list and tap `Edit`.
- 22. Choose the device type: water heater, heater, light control or other.
- 33. If the device measures electricity use, enable metering — you will see consumption on the Costs page.
- 7
Create your first rule
OptimaattiNow turn on the savings.
- Open `Rules` and tap `Create new rule`.
- Select the device you just added.
- Start with a simple template: `Cheapest hours` shifts usage to the most affordable times automatically.
- Save the rule. You will see on the timeline when the device is on.
- You can always override the automation and control the device manually.
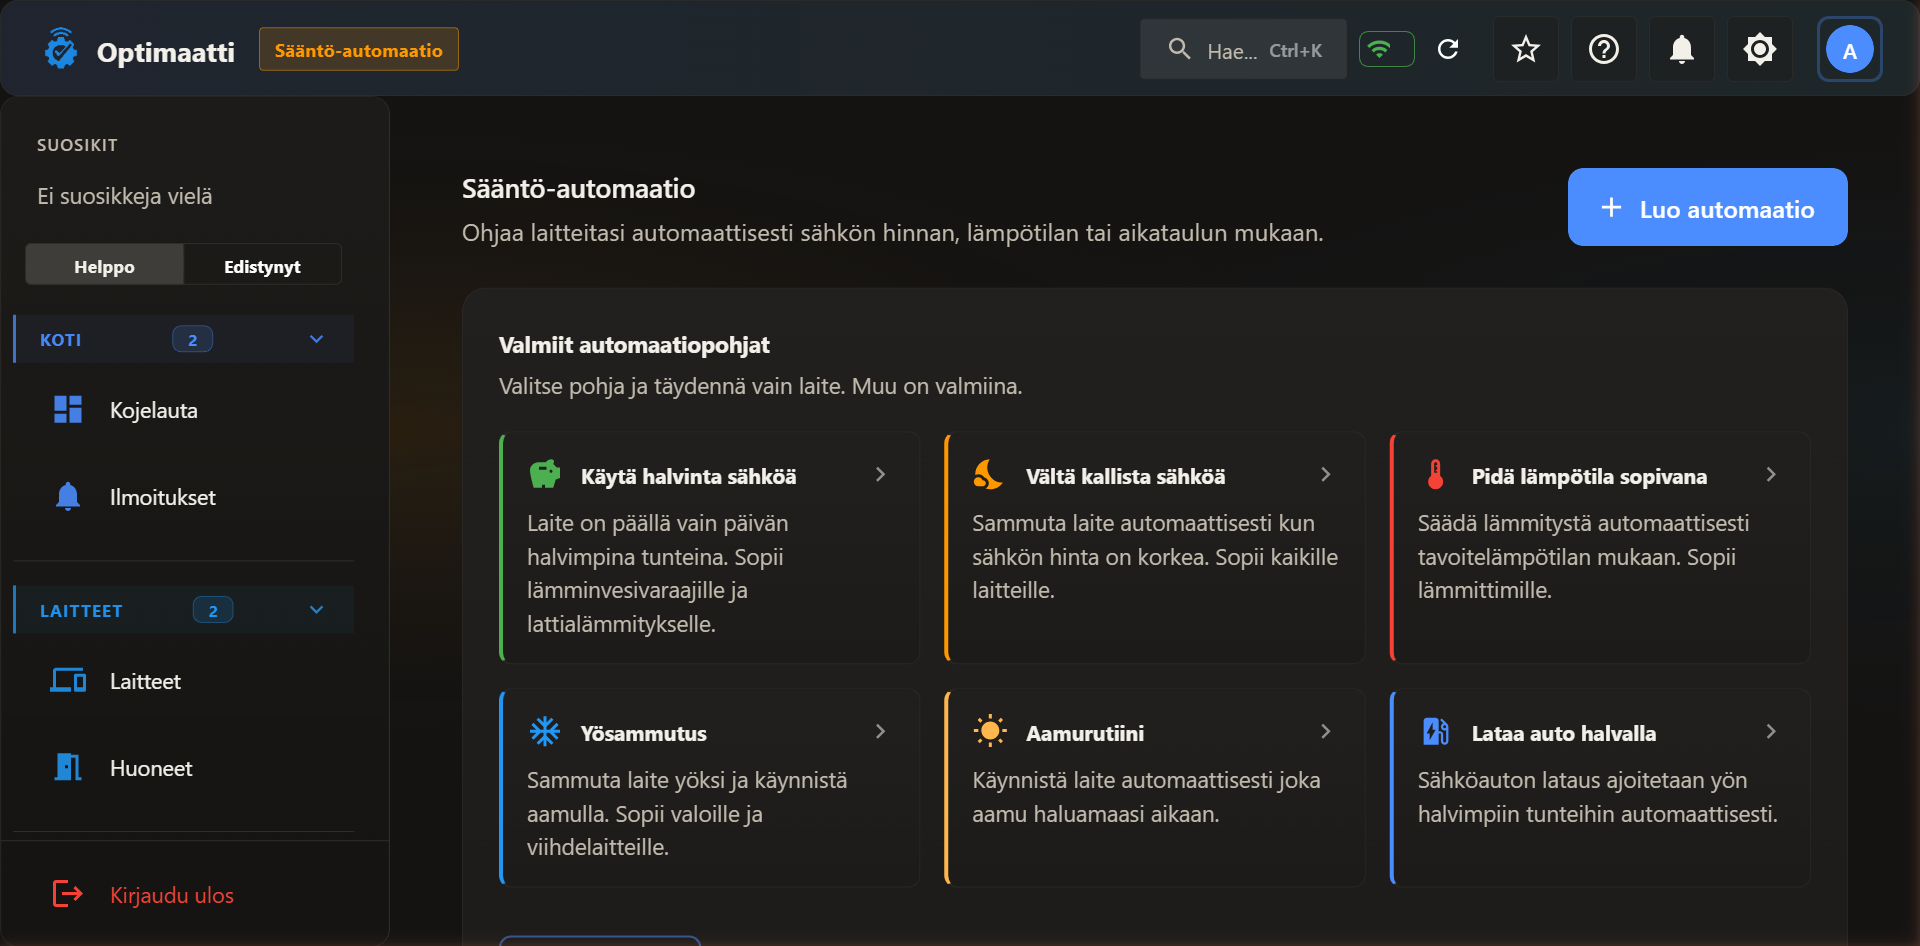
Templates: `Use cheapest power`, `Avoid expensive power`, `Keep temperature comfortable` and others. Check these in the screenshot:
- 11. Open `Rules` and tap `Create new rule`.
- 22. Select the device you just added.
- 33. Start with a simple template: `Cheapest hours` shifts usage to the most affordable times automatically.

The timeline shows automation, ordinary heating and outside temperature together — this is where you see savings form. Check these in the screenshot:
- 11. Open `Rules` and tap `Create new rule`.
- 22. Select the device you just added.
- 33. Start with a simple template: `Cheapest hours` shifts usage to the most affordable times automatically.
Pick a template that matches the device type — `Cheapest hours` is a safe choice for water heaters and electric heaters.
Done — your first savings are set up!
Optimaatti now controls your Shelly based on the cheapest electricity hours. Your first savings appear on the Costs page within a couple of days.
Stuck?
Three most common issues and quick fixes:
- Device will not connectCheck the password (the most common cause) and that you are on the same Wi-Fi.
- Readings keep droppingCheck the connection port — usually 8883 (TLS).
- Rule will not triggerCheck the device clock and timezone in the Shelly app.